Labs as Code, Part 1: Install netlab, Build a Lab in Five Minutes
Think about the last lab you built by hand. Dragging routers around a canvas, wiring links one at a time, inventing an addressing plan you’d forgotten by Thursday, and pasting the same baseline config into every node before you could even start on the thing you built the lab to learn. The plumbing takes hours. The learning is supposed to be the point.
netlab deletes the plumbing. You describe the lab you want in a few lines of YAML… which devices, which links, which protocols. netlab computes the wiring, assigns every address, generates every config, and hands you a running topology. It’s the same everything as code idea we’ve been applying to production networks, pointed at the lab, and it’s the work of Ivan Pepelnjak, who’s spent longer than most of our careers explaining how networks actually work at ipSpace. Ivan’s a friend, which is both a disclosure and part of the reason I finally sat down with this tool properly. The tool earns the series on its own.
What netlab actually does
netlab sits on top of tools you may already run. It uses containerlab to launch network operating systems as containers, and Ansible to push the initial configurations it generates. The part netlab adds is the brain… you declare intent (three routers, a triangle of links, OSPF everywhere) and it derives everything a human usually types… interface addresses from sane default pools, loopbacks, the OSPF process with its areas and network types, and the container wiring underneath. When the lab boots, the protocols are already up.
For this first lab we’re using FRR, the open source routing suite. No vendor accounts or image downloads, and no licensing dance to do first. The container pulls straight from a public registry, which means everything in this post works on any Linux box the same afternoon you read it. Commercial images come later in the series, and they’re a per vendor scavenger hunt worth its own writeup.
Install
You need a Linux machine (or VM) with Docker already on it. From there, the netlab install docs keep it to three commands… install pip, install netlab, then let netlab install everything else it needs.
sudo apt-get update && sudo apt-get install -y python3-pip
sudo python3 -m pip install networklab
netlab install ubuntu ansible containerlab
That last command is netlab installing its own companions, containerlab and Ansible included, which is why it wants sudo. If a newer Ubuntu complains about an externally managed Python environment on the pip step, the install docs cover the workaround… follow the current docs, since they’ll outlive this post.
Check your work.
$ netlab version
netlab version 26.08
That’s the whole install.
The entire topology file
Here’s the complete lab definition, the entire file, no trimming.
provider: clab
defaults.device: frr

module: [ ospf ]

nodes: [ r1, r2, r3 ]

links: [ r1-r2, r2-r3, r1-r3 ]
Nine lines, and half of them are whitespace. Worth reading slowly, because these four keywords are the vocabulary every future lab builds on.
provider: clab picks how the lab runs… containerlab here, meaning every router is a container. netlab also speaks libvirt for full VM images, and you can mix providers in one lab when a device only ships as a VM.
defaults.device: frr sets what every node is unless told otherwise. Any single node can override it, which is how multi vendor labs happen later… one default, exceptions where you want them.
module: [ ospf ] declares which protocols netlab should configure. Modules are netlab’s feature units (OSPF, BGP, VLANs, VRFs, EVPN, the list is long), and listing one here enables it on every node and every link, with sane defaults for all of it. This single word is why the lab comes up converged instead of merely booted.
nodes: and links: are the topology itself, both in their shorthand forms. [ r1, r2, r3 ] is a plain list because these nodes need no per node settings… the moment one does, it becomes a dictionary entry with settings underneath (part two leans on that heavily). r1-r2 is shorthand for a point to point link, and a links entry with three or more nodes becomes a LAN segment instead. Every name in the file is one you chose. Everything else… addresses, router IDs, network types, the wiring… is about to be derived.
What you get for nine lines
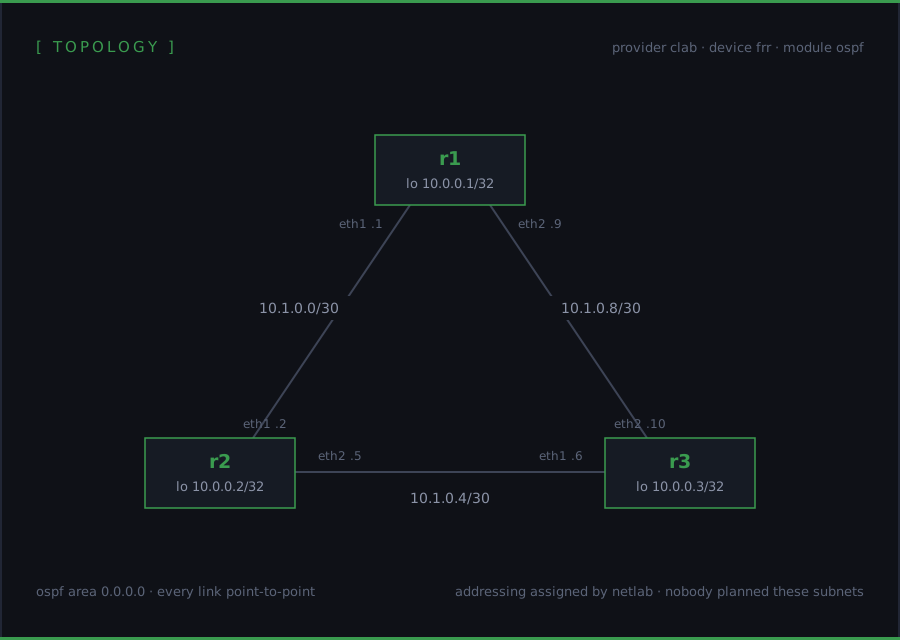
Save that as topology.yml and run netlab create in the same directory. It builds the containerlab wiring file, the Ansible inventory, and a per node data model, without starting anything. Then ask netlab what it decided.
$ netlab report addressing
  Node/Interface           IPv4 address        MTU Description
================================================================
r1 (10.0.0.1/32)
  eth1                      10.1.0.1/30       1500 r1 -> r2
  eth2                      10.1.0.9/30       1500 r1 -> r3

r2 (10.0.0.2/32)
  eth1                      10.1.0.2/30       1500 r2 -> r1
  eth2                      10.1.0.5/30       1500 r2 -> r3

r3 (10.0.0.3/32)
  eth1                      10.1.0.6/30       1500 r3 -> r2
  eth2                     10.1.0.10/30       1500 r3 -> r1
Every router has a loopback from 10.0.0.0/24. Every link got a /30 carved from 10.1.0.0/16, in link order, with both ends assigned. Nobody planned these subnets. Nobody typed them into an interface. And because the OSPF module saw three point to point links, every one of them is already set to network_type: point-to-point, the tuning step half of us forget on real gear.
Bring it up
One command starts everything… containers, wiring, addressing, and the Ansible run that pushes each node’s generated config.
netlab up┌────────────────────────────────────────────────────────────┐
│ CREATING configuration files │
└────────────────────────────────────────────────────────────┘
[CONFIG] r1: initial,ospf,daemons,hosts
[CONFIG] r2: initial,ospf,daemons,hosts (shared)
[CONFIG] r3: initial,ospf,daemons,hosts (shared)
[CREATED] provider configuration file: clab.yml
[CREATED] minimized Ansible inventory hosts.yml
┌────────────────────────────────────────────────────────────┐
│ STARTING clab nodes │
└────────────────────────────────────────────────────────────┘
provider clab: executing sudo -E containerlab deploy --reconfigure -t clab.yml
14:12:07 INFO Creating docker network name=netlab_mgmt IPv4 subnet=192.168.121.0/24
14:12:08 INFO Creating container name=r2
14:12:08 INFO Creating container name=r1
14:12:08 INFO Creating container name=r3
14:12:08 INFO Created link: r1:eth1 ▪┄┄▪ r2:eth1
14:12:08 INFO Created link: r2:eth2 ▪┄┄▪ r3:eth1
14:12:08 INFO Created link: r1:eth2 ▪┄┄▪ r3:eth2
┌────────────────────────────────────────────────────────────┐
│ CONFIG Deploying device configurations │
└────────────────────────────────────────────────────────────┘
[INFO] Executing initial configuration for node r1
[INFO] Executing initial configuration for node r2
[INFO] Executing initial configuration for node r3
[INFO] Executing ospf configuration for node r1
[INFO] Executing ospf configuration for node r3
[INFO] Executing ospf configuration for node r2
[SUCCESS] Lab devices configuredWatch the middle section… those three Created link lines are the triangle from the links list, wired exactly as declared, and the config deploy that follows is netlab pushing the per node configurations it generated. Two minutes, start to converged. netlab status shows what you own now.
$ netlab status
Lab default in /home/lab/blog
  status:      started
  topology:    topology.yml
  provider(s): clab

 node  device  image                         mgmt IP          VM/container  status
 r1    frr     quay.io/frrouting/frr:10.6.1  192.168.121.101  clab-blog-r1  Up 5 minutes
 r2    frr     quay.io/frrouting/frr:10.6.1  192.168.121.102  clab-blog-r2  Up 5 minutes
 r3    frr     quay.io/frrouting/frr:10.6.1  192.168.121.103  clab-blog-r3  Up 5 minutes
Connect to a node and look around… netlab gives you a shortcut for that too. netlab connect r1 drops you on the router, and FRR’s vtysh will feel like home to anyone raised on IOS.
$ netlab connect r1
Connecting to container clab-blog-r1, starting bash

Use vtysh to connect to FRR daemon

r1(bash)# vtysh

Hello, this is FRRouting (version 10.6.1_git).
Copyright 1996-2005 Kunihiro Ishiguro, et al.

r1#
First, the config netlab wrote so you didn’t have to.
r1# show running-config
frr version 10.6.1_git
frr defaults datacenter
hostname r1
service integrated-vtysh-config
!
interface eth1
 description r1 -> r2
 ip address 10.1.0.1/30
 ip ospf area 0.0.0.0
 ip ospf network point-to-point
exit
!
interface eth2
 description r1 -> r3
 ip address 10.1.0.9/30
 ip ospf area 0.0.0.0
 ip ospf network point-to-point
exit
!
interface lo
 ip address 10.0.0.1/32
 ip ospf area 0.0.0.0
exit
!
router ospf
 ospf router-id 10.0.0.1
 timers throttle spf 10 50 500
 timers throttle lsa all 100
 timers lsa min-arrival 100
exit
Interface descriptions that match the topology, a router ID that matches the loopback, and SPF throttle timers tuned tighter than most production networks bother with. Nine lines of YAML bought all of it. Two OSPF adjacencies, full, without ever typing router ospf yourself.
r1# show ip ospf neighbor

Neighbor ID     Pri State           Up Time         Dead Time Address         Interface
10.0.0.2          1 Full/-          5m13s             36.018s 10.1.0.2        eth1:10.1.0.1
10.0.0.3          1 Full/-          5m09s             36.081s 10.1.0.10       eth2:10.1.0.9
The routing table has every loopback and every link, learned the honest way. Look closely at 10.1.0.4/30, the far side of the triangle… two next hops. netlab’s topology handed you equal cost multipath without anyone asking for it.
r1# show ip route
Codes: O - OSPF, C - connected, L - local,
       > - selected route, * - FIB route

O   10.0.0.1/32 [110/0] is directly connected, lo
O>* 10.0.0.2/32 [110/10] via 10.1.0.2, eth1
O>* 10.0.0.3/32 [110/10] via 10.1.0.10, eth2
C>* 10.1.0.0/30 is directly connected, eth1
O>* 10.1.0.4/30 [110/20] via 10.1.0.2, eth1
  *                      via 10.1.0.10, eth2
C>* 10.1.0.8/30 is directly connected, eth2
And the actual point of a lab… traffic. Loopback to loopback, sourced properly.
$ ping -c 3 -I 10.0.0.1 10.0.0.3
PING 10.0.0.3 (10.0.0.3) from 10.0.0.1: 56 data bytes
64 bytes from 10.0.0.3: seq=0 ttl=64 time=0.076 ms
64 bytes from 10.0.0.3: seq=1 ttl=64 time=0.094 ms
64 bytes from 10.0.0.3: seq=2 ttl=64 time=0.095 ms

--- 10.0.0.3 ping statistics ---
3 packets transmitted, 3 packets received, 0% packet loss
Shut r1’s link toward r3 and the lab does what real networks do. Five seconds after eth2 went down, r3’s loopback was back in the table by the long way around.
r1# show ip route 10.0.0.3/32
Routing entry for 10.0.0.3/32
  Known via "ospf", distance 110, metric 20, best
  Last update 00:00:05 ago
  * 10.1.0.2, via eth1, weight 1
This is a real lab doing real convergence… the only thing missing is the afternoon you’d have spent building it.
Tear it down
$ netlab down

┌────────────────────────────────────────────────────────────┐
│ STOPPING clab nodes                                        │
└────────────────────────────────────────────────────────────┘
provider clab: executing sudo -E containerlab destroy --cleanup -t clab.yml
14:13:36 INFO Destroying lab name=blog
14:13:36 INFO Removed container name=clab-blog-r2
14:13:36 INFO Removed container name=clab-blog-r1
14:13:36 INFO Removed container name=clab-blog-r3
netlab down wipes the containers and the wiring. Nothing’s left running. The topology file stays. The lab is nine lines of YAML in a git repo. The containers were disposable the whole time. Blow it away on Tuesday, netlab up on Friday, get the identical lab back. Send the file to a coworker and they get your lab. Attach it to a bug report and the vendor gets your repro. Once the lab is a file, everything you already know about managing files with git applies to your lab bench. The lab stops being precious.
Nine lines replaced a canvas full of dragging, an addressing plan, and three hand pasted configs. Part 2 takes this same file and starts overriding defaults, one node at a time.
Disclosure: Ivan Pepelnjak, netlab’s author, is a friend. He didn’t ask for this series, didn’t review it before publication, and netlab is free software either way. The opinions here are mine. For more, please read my full disclaimer.
New posts in your inbox when they publish. No digest, no marketing.