Nexus Virtual Port Channel (vPC)
The Nexus 7000 and 5000 series have taken port-channel functionality to the next level by enabling port-channels to exist between links that are connected to different devices. Virtual Port Channels (vPCs) were introduced in NX-OS v4.1(4). vPCs offer better bandwidth utilization while allowing for device level redundancy with faster convergence times compared to multiple port-channels using spanning tree. vPCs also eliminate the need for spanning tree blocked ports.
The vPC Domain
vPCs are configured by associating two Nexus switches (Nexii?) into a vPC domain. Within that domain information is exchanged across two special link types. The vPC peer-keepalive link provides heartbeating between the vPC peers to ensure that both devices are online – preventing any active/active (split-brain) scenarios that could present loops into the topology. The vPC peer link is used to exchange state information between the vPC peers. It also provides additional mechanisms that can detect and prevent any split-brain circumstances.
vPC Configuration
Our first step here is to enable the vPC feature on N7k-1 and -2.
N7k-1# conf t
Enter configuration commands, one per line.  End with CNTL/Z.
N7k-1(config)# feature vpc
Once complete, we can create our VRF for the VPC keepalive, and test its connectivity.
N7k-1(config)# vrf context vpc-keepalive
N7k-1(config-vrf)# int eth 2/10
N7k-1(config-if)# no switchport
N7k-1(config-if)# vrf member vpc-keepalive
N7k-1(config-if)# ip add 10.1.2.1 255.255.255.252
N7k-1(config-if)# no shut
!
N7k-2(config)# vrf context vpc-keepalive
N7k-2(config-vrf)# int eth 2/10
N7k-2(config-if)# no switchport
N7k-2(config-if)# vrf member vpc-keepalive
N7k-2(config-if)# ip add 10.1.2.2 255.255.255.252
N7k-2(config-if)# no shut
!
N7k-1# ping 10.1.1.2 vrf vpc-keepalive
PING 10.1.1.2 (10.1.1.2): 56 data bytes
64 bytes from 10.1.1.2: icmp_seq=0 ttl=254 time=1.24 ms
64 bytes from 10.1.1.2: icmp_seq=1 ttl=254 time=0.941 ms
64 bytes from 10.1.1.2: icmp_seq=2 ttl=254 time=0.808 ms
64 bytes from 10.1.1.2: icmp_seq=3 ttl=254 time=0.817 ms
64 bytes from 10.1.1.2: icmp_seq=4 ttl=254 time=0.816 ms

--- 10.1.1.2 ping statistics ---
5 packets transmitted, 5 packets received, 0.00% packet loss
round-trip min/avg/max = 0.808/0.924/1.24 ms
We can now assign this as our vPC domain’s peer-keepalive link and verify that it is working.
N7k-1(config)# vpc domain 1
N7k-1(config-vpc-domain)# peer-keepalive destination 10.1.1.2 source 10.1.1.1 vrf vpc-keepalive
!
N7k-2(config)# vpc domain 1
N7k-2(config-vpc-domain)# peer-keepalive destination 10.1.1.1 source 10.1.1.2 vrf vpc-keepalive
!
N7k-1# show vpc
(*) - local vPC is down, forwarding via vPC peer-link
vPC domain id : 1
Peer status : peer link not configured
vPC keep-alive status : peer is alive
Configuration consistency status: failed
Configuration consistency reason: vPC peer-link does not exist
vPC role : none established
Number of vPCs configured : 0
Peer Gateway : Disabled
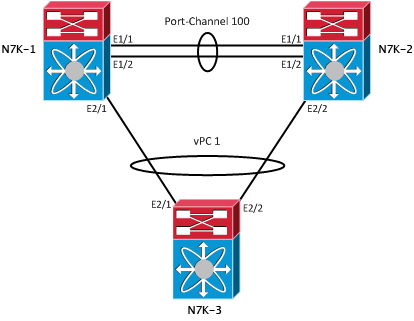
Dual-active excluded VLANs : -Since our vPC keep-alive is working, we can move on to configuring the peer-link. Which, as shown in the diagram is made across Port-Channel 100. First we’ll define the Port-Channel, then configure it as the vpc peer-link.
N7k-1(config)# int ethernet 1/1 - 2
N7k-1(config-if-range)# channel-group 100 on
N7k-1(config-if-range)# interface port-channel 100
N7k-1(config-if)# switchport
N7k-1(config-if)# switchport mode trunk
N7k-1(config-if)# vpc peer-link
Please note that spanning tree port type is changed to "network" port type on vPC peer-link.
This will enable spanning tree Bridge Assurance on vPC peer-link provided the STP Bridge Assurance (which is enabled by default) is not disabled.
!
N7k-2(config)# int ethernet 1/1 - 2
N7k-2(config-if-range)# channel-group 100 on
N7k-2(config-if-range)# interface port-channel 100
N7k-2(config-if)# switchport
N7k-2(config-if)# switchport mode trunk
N7k-2(config-if)# vpc peer-link
Please note that spanning tree port type is changed to "network" port type on vPC peer-link.
This will enable spanning tree Bridge Assurance on vPC peer-link provided the STP Bridge Assurance (which is enabled by default) is not disabled.
!
N7k-1# show vpc
                (*) - local vPC is down, forwarding via vPC peer-link

vPC domain id                   : 1
Peer status                     : peer adjacency formed ok
vPC keep-alive status           : peer is alive
Configuration consistency status: success
vPC role                        : primary
Number of vPCs configured       : 0
Peer Gateway                    : Disabled
Dual-active excluded VLANs      : -
vPC Peer-link status
---------------------------------------------------------------------
id   Port   Status Active vlans
--   ----   ------ --------------------------------------------------
1    Po100   up     1-20,100
Now we’re finally able to add our ports to the vPC itself.
N7k-1(config)# interface eth2/1
N7k-1(config-if)# channel-group 1 mode active
N7k-1(config-if)# no shutdown
N7k-1(config-if)# interface port-channel 1
N7k-1(config-if)# switchport
N7k-1(config-if)# switchport mode trunk
N7k-1(config-if)# vpc 1
!
N7k-2(config)# interface eth2/2
N7k-2(config-if)# channel-group 1 mode active
N7k-2(config-if)# no shutdown
N7k-2(config-if)# interface port-channel 1
N7k-2(config-if)# switchport
N7k-2(config-if)# switchport mode trunk
N7k-2(config-if)# vpc 1
!
N7k-1# show vpc 1

vPC status
----------------------------------------------------------------------
id   Port   Status Consistency Reason                     Active vlans
--   ----   ------ ----------- -------------------------- ------------
1    Po1   up     success     success                       1-20, 100
The final step in all of this is to configure the port-channel on the third switch. This is configured as a normal port channel, no special configuration options are needed. In fact, the third switch can be of any type (6509, 3750, etc).
N7k-3(config)# int ethernet 2/1 - 2
N7k-3(config-if-range)# channel-group 1 on
N7k-3(config-if-range)# interface port-channel 1
N7k-3(config-if)# switchport
N7k-3(config-if)# switchport mode trunkGet the rest of The Early Nexus Years in your inbox.