The Holy Hackintosh Build
This is a follow up to my previous Hackintosh post chronicling the build and setup of my ‘Hack Pro’. My original goal was to build a Mac Pro clone using off the shelf parts, with the ability to do Apple Software Updates on a retail, unmodified OS X installation as you would with a real Mac. So far, using the steps described here, I’ve been successful.
There are several methods that have worked for many people, but had little success on my system. The myHack installer allows you to highly customize your install, and honestly learn a lot more about what you’re doing in the process since its more of a manual operation than others.
Please note that this guide is for installing a system based on my hardware specs in the previous post…
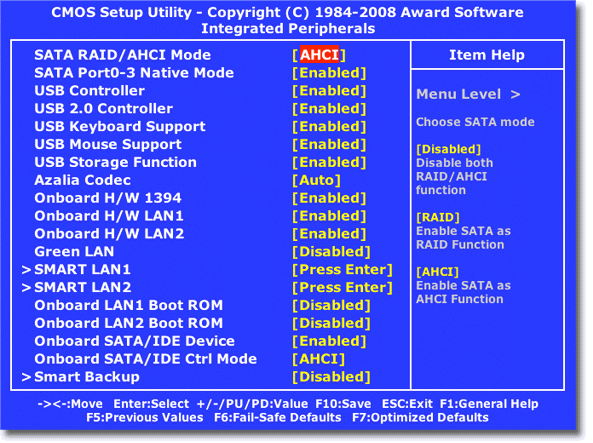
BIOS Settings
In order to ensure maximum compatibility some changes to your BIOS setup are required. First off, you’re going to want to flash your bios to version F9m (BIOS Upgrade included at bottom of post).. Changing your SATA ports to be controlled via AHCI is the most important step. Use the following settings on your ga-ex58-ud5.. (taking from the digital dreamer guide. )
Prepare USB Installer
The next step is to prepare your USB Installation media. Below are the instructions from the myHack site, with notes added in from my observations. Please visit their site for detailed and up to date instructions.
- Partition and format USB device using either MBR or GUID partition scheme in disk utility.
- Restore OS X Install DVD to USB using disk utility. ( I had no success using my .dmg or .iso, I had to insert my actual disc. )
- My Steps Create the /Extra and /Extra/Extensions directory on your USB stick. Copy the DSDT.AML file to /Extra and kexts to /Extra/Extensions (From files section at bottom) ( Only use my DSDT if you’re on F9m Bios version)
- Run myHack installer and install it to the USB drive you just prepared.
- At this point you should make any additional alterations that you may require to the USB drive (add additional kexts, dsdt, etc). Note: Ensure that you have repaired permissions and generated a fresh Extensinons.mkext if you have modified any kexts manually.
- Thats about it, you should now be ready to test your installer on your target system.
Important Information:
EXTREMELY IMPORTANT!!! IF YOU ARE RUNNING THIS INSTALLER ON A REAL APPLE COMPUTER TO PREPARE A USB INSTALLER READ THIS!!! I can not possibly stress how important it is that you ensure you are installing to the USB drive and NOT the root partition of the computer you have run the installer on. The root partition is selected by default. If you install the Chameleon Bootloader (one of the core components of the myHack Installer) to the root partition of a REAL Apple Computer you will BREAK the system and it will fail to boot!!! I’d like to reiterate that statement.
If you install the Chameleon to the root partition of a Apple Computer you will break the system and it will fail to boot!
The GraphicsEnabler option will enable graphics acceleration on most Nvidia 8xxx/9xxx/2xx graphics cards & a few ATI graphics cards*. If the GraphicsEnabler option fails to work for you at first try changing the PciRoot value in the com.apple.Boot.plist manually. If your system still fails to have functional graphics use the GraphicsDisabler option instead until you find a solution. *ATI Graphics may require additional kexts to function correctly. (Note: I do not support ATI cards, I suggest you visit netkas’ site for information on ATI graphics hardware).
The GraphicsDisabler option is selected by default in the myHack installer when installing to a USB installation device to ensure installer functionality on as many systems as possible. I strongly advise you to not use GraphicsEnabler on USB Installers since there is no way to reliably determine if your target system will have supported graphics, what the PciRoot of the target systems graphics is, or if a future OS X software update will break the GraphicsEnabler’s functionality. The USB Installer serves two purposes, one is installation (obviously) the other is for recovery/repair of broken installations, therefore the goal should be to make it as universally compatible as possible. IMPORTANT NOTE: If you are using GraphicsEnabler or gfx strings do not use the GrahpicsDisabler option! One or the other can be used but not both.
Install
The next step is to boot off the USB installer on your hackintosh. On the ga-ex58-ud5 it will show up as a Hard Disk on the boot menu. Go ahead and install OS X as normal, go through the initial configuration, but as per on the myHack website they do not recommend using migration assistant.
Post Install
After the install, use the USB installer to boot your Snow Leopard install. When you make it to your desktop, open the finder and locate the myHack installer on the root of your USB stick. Run the myHack installer, this time installing to the snow leopard partition on your internal hard drive instead of the USB device. Generally speaking you should use select the same options as you did before when you prepared your USB installer since you know that it boots correctly. Make sure you copy over any additional changes you made to the USB installer (additional kexts, dsdt, etc) to your internal hard drive’s snow leopard partition. ( Make sure to run /pfix after making changes to repair permissions… )
First Boot
You should now be ready to reboot your system without the USB installer attached. Unmount the USB drive and reboot the system with the internal drive.
Congratulations! If all went well you now have a functional Snow Leopard installation running on your system. Generally speaking with vanilla OS X installs you can use software update without much concern. The updates you should avoid to install through software update are the “10.6.x Updates” which will contain a full revision # (10.6.1, 10.6.2, etc). I will update this page with what we know about each software update as it becomes available and what benefits/potential problems will result from installing it. It is important that you do not install these updates until you have researched and ensured your system will not be negatively impacted by them.
Go ahead and download the 10.6.2 Combo update and install it. Feel free to run a software update afterward and everything should be just fine. In my next post I am going to talk about some of the customizations you can make to your system, including the boot loader screen, and fixing some issues with how hardware appears to the system.
Neccessary Files
As usual if you have any questions please feel free to comment below and I’ll be glad to help or point you in the right direction if I can.
Get the rest of Hackintosh Build in your inbox.